Page Contents
1. Purpose
To provide a procedure for operating the TOC Analyzer.
2. Scope
This covers the procedure for operating TOC Analyzer.
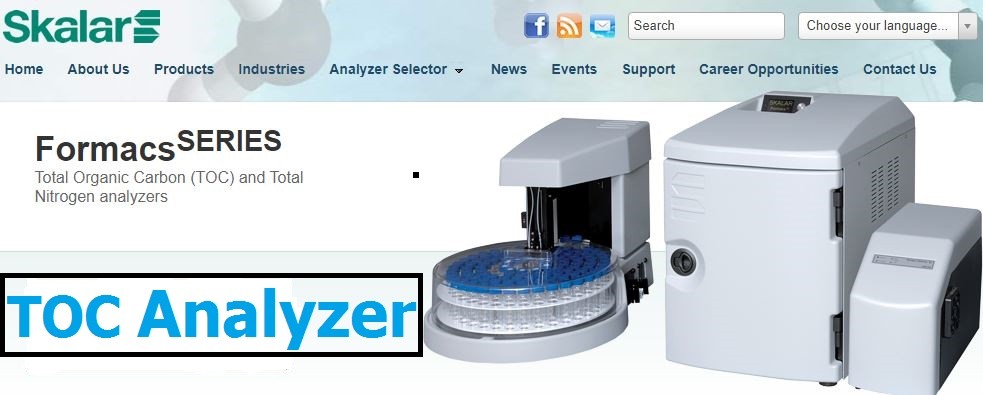
MAKE: SKALAR FormacsHT
Total Organic Carbon Analyzer
3. Responsibility
Analyst
Quality Control Manager
4. Operation
- Operating instructions for TOC Analyzer
4.1 Follow these Checks before starting equipment
4.1.1 Use oxygen of minimum purity of 99.995% & it should be free from CO2 content.
4.1.2 Check & ensure that the oxygen cylinder is opened & the output pressure is between 6.0-8.0 bars.
4.1.3 Also check the pressure on the oxygen purification System, it should be between 5.0-6.0 bars (output which is going to instrument)
4.1.4 Use high-purity water (reagent water), having a TOC level of less than 100 ppb.
4.1.5 Stabilized power supply of 230 V, 50 Hz.
4.1.6 In NPOC Method fill the phosphoric acid bottle with high-purity water.
4.1.7 In NPOC Method add 1.0 ml of 2N Hydrochloric acid to each 100.0 ml sample.
4.1.8 Use a 5-10 liter bottle for drain, the drain water should flow freely.
4.1.9 Note: if the TOC analyzer is not in working condition then perform the oxidizable test.
4.2 Glassware
4.2.1 Use dedicated glassware for the preparation of standard & sample.
4.2.2 Clean the sample bottle with approximately 10% nitric acid and rinse with high purity water five times and dry the bottles in the oven and close the cap.
4.2.3 While collecting the sample completely fill the bottle by sample and cap the bottle.
4.3 Operating Procedure of TOC Analyzer
- The air/oxygen flow is lead to the FormacsHT or divided into air streams when both carbon and nitrogen are to be measured; one to the ND25 detector.
- The airflow passes a valve, where the flow can be set on and off. If a sampler is present the flow is divided again into two streams. The flow in the Formacs HT is regulated to 200ml/min (shown as flow out in the info panel) and then passes a restrictor.
- The carrier gas is divided again. A small part of the flow is used for rinsing the TC and IC head; the rest then enters via a one-way valve in the high-temperature TC/TN reactor. When TC and/or TN IS to be analyzed the sample is injected through the TC sample injection port by a syringe. The combusted sample joins the carrier gas.
- The carrier gas passed through a Teflon cooling coil where the flow is cooled and then passes the condensation trap where any liquid is removed.
- The carrier gas then enters the liquid IC/NN reactor via a safety vessel. When IC/NN is to be analyzed the sample is injected through the IC/NN sample injection port into the acid solution. The evaporated sample is joins the carrier gas.
- The carrier gas is then cooled to approx. 2by the Peltier cooler where any liquid is removed.
- The carrier gas then passes a halogen scrubber to remove any halogen and a dust filter.
- The carrier gas enters the infrared detector and is analyzed on CO2 the signals are passed on computer for calculation.
- The carrier gas passes a filter and then the flow meter. The flow meter checks the gas flow, a drop in the gas flow will be shown on the info screen on the computer.
- Open the valve of oxygen gas cylinder & gas supply pressure reducer.
- Switch on the main switch of TOC analyzer present on right top backsides of analyzer.
- Switch on the computer.
- Double click on software icon, log on by giving the login name and password.
- Initialize the system by click on yes.
- During the warm-up period the system will be stabilized for temperature, Gas flow and NDIR values. Observe these values by on the systems;
Non-dispersible Infra red OK
Gas flow OK
Temperature OK
- If the analyzer is not ready for measuring after 45 minutes (one or more components are still shown red in the system window) check the tube connections and search for faults like gas leakage in the system etc.
4.4 Measurements with manual sampling
4.1 Select manual sampling in the system window by clicking on the manual button.
4.2 Click on the Method-Load, mark an existing method in the load method database window and confirm the selection by clicking on the OK button.
4.3 Open the menu, Measurements click on start measurements, enter the sample ID in the measurement start window and click on the start button.
4.4 Start the measurement by clicking on the start measurements button.
4.5 At the end of the analysis take the printout.
4.6 Method creation
To import a method from a database:
1 . Press the import method from the database. A dialog box is opened.
- Select the directory where an existing method can be selected to be imported and click open.
- The method will be displayed on the method screen.
- Press save and exit.
To add a new method:
- Press Add new Method. A new method is displayed on the screen, where a number of settings for the analysis can be set.
- Change the settings as required. The name of the method can be changed as well if required.
- Press Save and Exit. The method can be added to a new analysis.
To delete a method:
- Select the method to be deleted.
- Press the delete Method. The method is deleted from the list.
Precautions
- Always read very careful the safety precautions and the user manual of this instrument and comply with them.
- The instrument should only be placed on a leveled, clean, dry, and sturdy surface at the appropriate height; (re-) installation of the instrument should always occur with the greatest care.
- Never place the unit in an area where it will be exposed to extreme heat, moisture, or corrosive materials.
- Unauthorized personnel is not allowed to sojourn in the neighborhood of the instrument.
- Always wear the appropriate personal protective means, when working with the instrument.
- Only qualified personnel should operate the instrument or carry out repair of the exposed equipment.
- Before the instrument is connected to the mains and switched on, check whether the required voltage (indicated on the type plate at the back of the instrument) corresponds with the line voltage.
- The instrument power cord must only be plugged into a line supply outlet with a ground protector (earth). If an extension cord is used, make sure that the protector line is not interrupted.
- Before starting to operate the instrument the operator needs to have knowledge of the safe operation of the instrument; immediately contact the responsible person at any doubt.
- Check before use of the instrument if all functions work; don’t take any risk and engage an expert in any doubt.
- The instrument may not be switched on without correct shielding.
- Make sure to have a good overview when using the instrument.
- Always use the prescribed parts on the instrument.
- Never overload the instrument.
- Never place any objects on top of the instrument.
- Opening the instrument or disassembling parts of the instrument can set free voltage-carrying parts while the instrument is connected to the mains. Also, connectors could carry voltage. Before any service, repair or change of parts, the instrument has to be disconnected from all power supplies.
- Service and repair work on voltage-carrying open instruments should be avoided whenever possible. If such work is absolutely necessary, qualified personnel, who are aware of the hazards of this work, should carry it out.
- When electronic components are to be repaired or replaced, the service engineer has to wear a wristband for protection against static electricity.
- Report any unsafe condition or handling of the instrument to the expert.
- Whenever it is likely that safe operation is impaired, i.e. at excessive vibration or noise, the instrument must be made inoperative and secured against unintended operation. The appropriate servicing personnel must then be informed.
- Only use original parts.
- Keep hands, jewelry, hair, etc. away from the inside of the instrument whenever it is in operation.
- The front and top covers of the instrument can be opened at any time, but care should be taken as the interior has hot areas, allow a one-hour cooling-off period for maintenance purposes.
- Always use the prescribed detergents and materials for cleaning the instrument,
- Be aware that the instrument requires chemicals. Handle with care. Check the local environmental legislation for proper disposal of waste.
5.0 Cleaning and maintenance of TOC Analyzer
Routine maintenance, time-based
The duration periods given below are based on average usage, an exact duration depends on the sample matrix, the analytical ranges, and how frequently the instruments are in use. The mentioned hours are assuming continuous sample injections.
5.1 Daily (6 hours)
- Check standards (prepare working standards in the low range daily).
- Inject-check standard solution into the TC/TN and IC/NN to check the validity of the calibration curves, available in previous runs. At a deviation of + or -5% from the check value for TC/TN the catalyst needs to be replaced.
- Check flow out. If the flow out is 15% lower than started in the morning, check on leaks or blockages (for instructions see chapter 8).
- Check the liquid level in the IC/NN liquid reactor. Add the necessary amount of 2% phosphoric acid into the reaction chamber (see chapter 3.3, IC reactor) for IC and reactivity solution for NN.
- Clean the NN reactor (preferably after each run).
5.2 Weekly (30 hours)
- Check the pump tubing at the pumps in the analyzer. No liquid may remain in the tubes.
- Inspect the waste tubes of the TC and IC port, as well as the pump tubing that supplies gas to the TC and IC head…
5.3 Months (720 hours)
- Replace pump tubing (for instructions see chapter 7.3).
- Change the catalyst of the TC reactor (for instructions see chapter 7.6) and check the TC tube for damages (see example in figure 7.9).
- Check the halogen scrubber (2CA10080). Replace if the color has changed for more than 75% of the surface.
- Clean the syringe and replace the syringe if the liquid is present below the tip of the syringe (for instructions see chapter 7.8).
- (If applicable) replace the filling of the CO2 air scrubber if contaminated (violent indication). For instructions see chapter 7.2.
- Check the IC reactor (2CA16061) and condensation trap (2CA10070). Clean if dirty.
5.4 Each year
- Replace all connection tubing, supply tubing, and waste tubing (it is advised to leave this to a Skalar technician).
- Replace the dust-water filter (for instructions see chapter 7.9).
- As per the TC tube condition, Replace the TC tube.
- Also Replace the inline filter (5380, placed on the gas outlet of the IR detector).
- Check all TC and IC sealing rings in the system. Replace if necessary.
- Check all points mentioned in A-C.
6.0 Calibration of TOC Analyzer
Preparation of the working standard solutions for the calibration curve
Prepare organic and inorganic carbon calibration series and/or total nitrogen and nitrate/nitrite calibration series by diluting the stock solutions to cover the expected range in the samples. If necessary, prepare a dilution with a concentration in between the concentration of the stock solution and the concentration of the highest standard in the calibration curve. E.g. if a working range is from 1 to 10 mg C/l (1 to 5 mg N/l) a first dilution to 100 mg C/l ( 100 mg N/l ) from the stock solution enables more accurate handling in volumes to dilute.
Preparation of the TC stock solution: 1000 mg C/l
Dissolve 2.128 g potassium hydrogen phthalate in carbon-free water and dilute to 800 ml. fill up to 1000 ml; 1.00 ml= 1.00 mg carbon. Mix well. The standard will be stable for about 4 weeks at 4, in the well-closed bottle.
Preparation of the IC stock solution: 1000 mg C/l
Dissolve 4.418 g sodium carbonate in carbon-free water, add 3.500 g sodium hydrogen carbonate and dilute to 1000 ml; 1:00 ml 1.00 mg carbon. Mix well. The standard will be stable for about 4 weeks at 4 in a well-closed bottle.
Default calibration curves
Select Default calibration curves from the settings menu and the next window appears (see figure 4.24). By selecting the TC, IC, TN, OR NN button the default calibration curve (s) for the selected parameter is shown.
Acceptance criteria: Correlation coefficient greater or equal to 0.999.
Frequency: Six months.
visit,


